Wednesday, May 14, 2014

Artichoke: A How To

"At least you"ll never be a vegetable, even artichokes have hearts"
- Amelie

Since one of my favorite movies came out, I have always been stuck with deciphering the meaning of artichokes having heart. Being a French movie, at the time I found this mild flavor and intricate vegetable very exotic. I thought only those who are like Amelie, living in a fantasy land would have the luxury to have artichokes. 


A few years later, artichokes (the canned ones, that it) start appearing on pizza, salads, pasta...etc. Now, seems to creep into the big chain super market like pomegranate once did. There seems to be a serge of marketing for new fruits and vegetables. It's crazy to say, but I have not had a fresh artichoke until last week.


From one of my podcasts (Splendid Table), I learned what you should look for when choosing artichokes:
  • Leaves that are tightly packed (unlike what I had), bit of brown spots is fine.
  • Hold the artichoke next to your ear and squeeze the artichoke. Yes squeeze. It should squeak, like squeaky fresh cheese curds.
  • Of course, no visible damages/molds etc...


Artichokes have two prime seasons, one early spring and another late summer. At a dollar piece, it's a new vegetable worth while to try. After buying these two artichokes weeks earlier, I finally took them out from the back of the refrigerator and baked them.


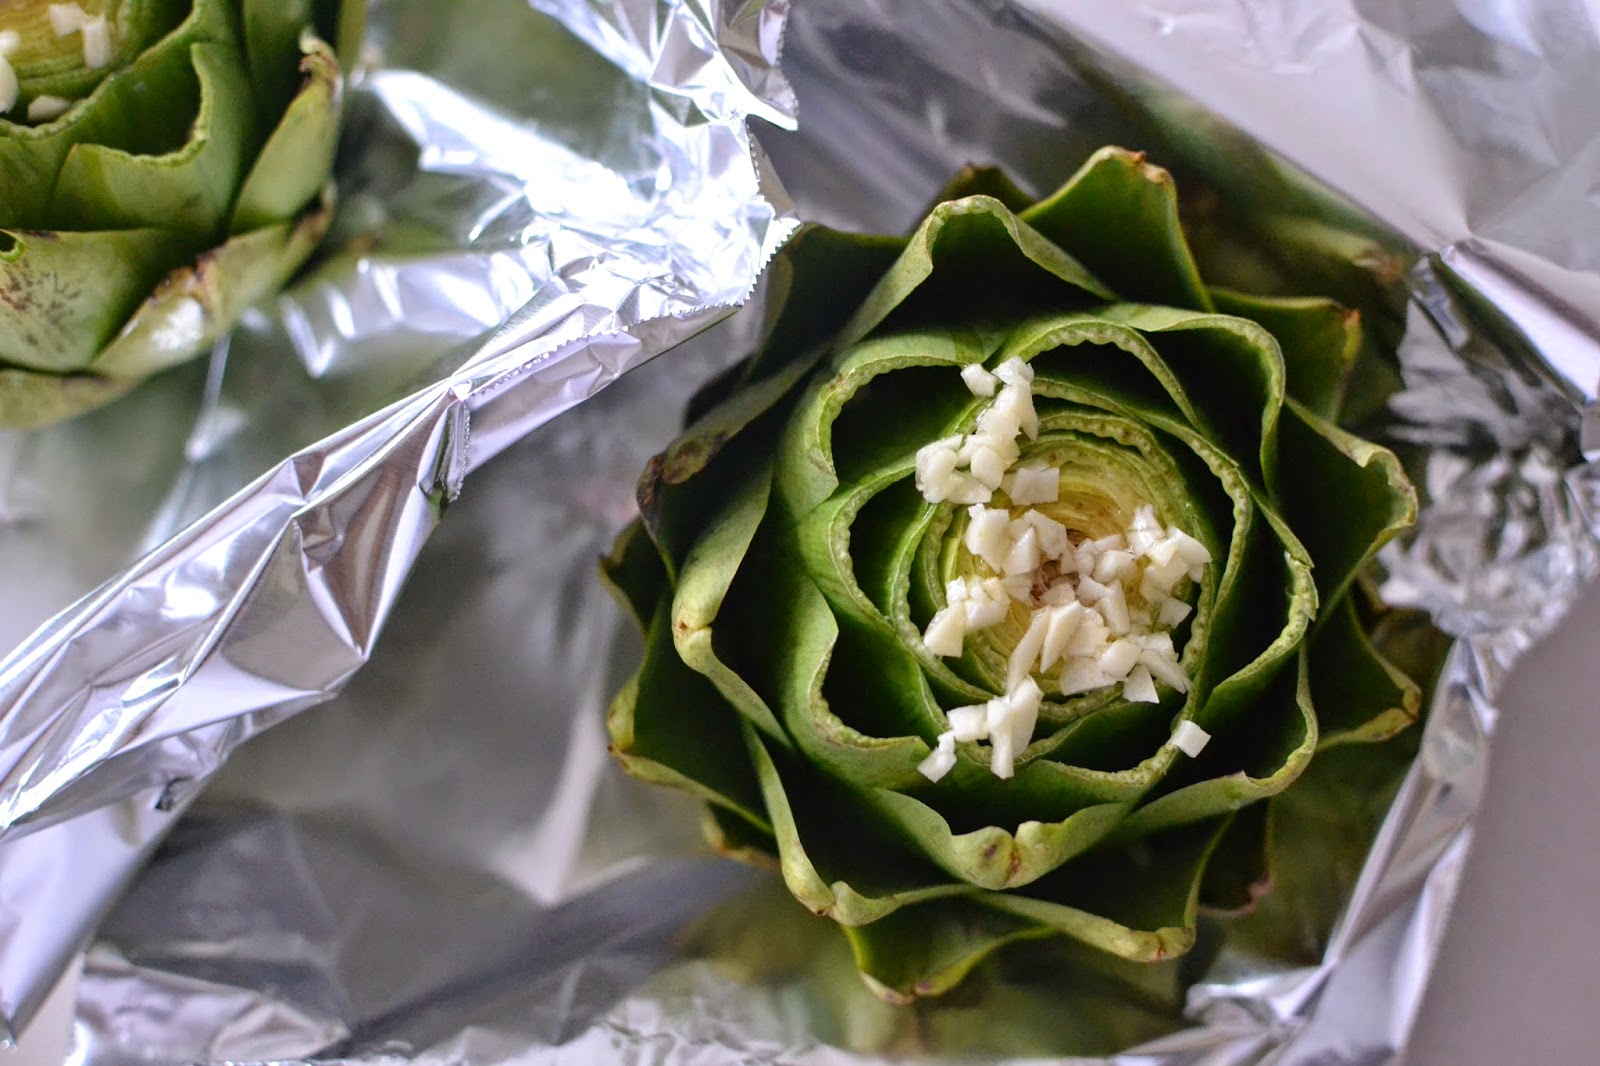
To cook artichokes, cut the top fourth portion off and trim the bottom stem. You want to cut off the top enough to see some purple. So more than what I did. Spread the leaves apart. Sprinkle the top with fresh juice of one half lemon, minced garlic, salt and drizzle with some olive oil. Wrap the artichokes in foil and bake for 40-60 minutes at 425 degrees. Mine were done at 40 minutes.

You can also steam or boil artichokes. Boil these babies in water with salt and acid (vinegar, lemon juice) to prevent darkening.


To enjoy artichoke, remove each leave and dip in garlicy butter sauce. Scrape the leave between your teeth for the flesh. Discard the flesh. The artichoke heart is in the middle, cut it open and scoop out the fuzzy part. Enjoy the heart!


As a dietitian, I always tell people to try new foods especially vegetable. Artichokes have a mild flavor that I think most people would enjoy. The prepping and eating may be something new, but it's worth the adventure!

Monday, April 21, 2014

Greek-Style Yogurt


In case you haven't noticed, there is something about this tangy and creamy dairy product that Americans are obsessed about. It's Greek yogurt (or Greek-style yogurt, for those that are not made in Greece). At first I thought it was another fad diet people are through, like dehydrated fruit pieces in dry cereal. But it looks as if Greek yogurt are the parasites of the refrigerated section. This yogurt phenomenon is growing so rapidly that it is taking over the dairy section. Supermarkets are to make space for new products that good ol' margarine has to move out of the space (so long margarine in a spray bottle). Brands even have to make cuts among its products to include Greek yogurt to fulfill people's crave.


There's an excellent podcast from BBC Food Programme on the Greek yogurt bloom. Yes, the obsession extends beyond America. I think this obsession caught on the end of the yogurt train starting from the 70s and got off at today's healthy-loving era. Simultaneously, people are on this "I need more protein!"kick. The reason Greek yogurt has more protein is because the yogurt is strained with more liquid (whey) removed. This makes a more concentrated product than regular yogurt, hence more nutrient dense especially protein.


Its texture and tanginess that often off puts people. My self included, at least at first until I tried Fage. It's one of the best tasting Greek yogurt I ever had. But at more that $5 a carton, sometimes the cost throws me off. It's a love-hate relationship.

You probably guess by now, I did what any frugal foodie would do.

I made my own yogurt. I can't exactly call this "Greek yogurt" since this was not made in Greece. (Read about the debacle on Chobani's loses on "Greek Yogurt" Legal Battle in U.K.  over the use of the word "Greek"). But the idea is I make yogurt, strain yogurt, enjoy yogurt.


The process is very simple, but requires some "babying" and time. I used a neck heat pad to maintain the temperature at 90-110 degrees. But there are lots of methods on maintaining the temperature, such as setting the oven at warm (or cooler) and incubate the yogurt over warm water. Some recipes called for dried milk powder for better texture, but mine turned out great. Straining time all depends on how thick you like the yogurt to be. The leftover liquid (whey) can be used to make bread, ricotta cheese (if you are bringing this homesteading to the next level), juicing, soups, etc...


Homemade Greek-Style Yogurt
Recipe adapted from seriouseats.com

4 cups of good quality milk (fat percentage is up to you)
2 tablespoons of yogurt (as starter; Greek or regular is fine)
Cheese cloth

  1. In a heavy-bottomed pot over medium heat, bring milk to 180°F, stirring regularly to prevent scorching. Once milk has reached temperature, allow it to cool to 110°F.
  2. When milk has cooled, add 2 tablespoons of yogurt to the pot and whisk thoroughly to combine.
  3. Pour milk and starter mixture into a 4 quart container and cover with saran wrap. Place the container in a warm environment and keep the temperature around 90-110°F overnight (6-8 hours) until yogurt has set. (Yipee! You've successfully made yogurt!)
  4. Pour the yogurt over a large container with two layers of cheese cloth over it. Allow yogurt to strain through the cheese cloth for 6-8 hours or until desired thickness is achieved. 
  5. Refrigerate and enjoy!

Sunday, March 2, 2014

Ode to the Mallow!


There were a few things occurred the last two weeks that brought some emotions into my life.

Here are those things :
1) Seeing AT&T's Noelle Pikus-Pace Olympics training commercial every night, and later to see her win a silver in women's skeleton event.
(See commercial here: http://youtu.be/7505xlW_zik)

2) Watching Meryl Davis and Charlie White's figure skating performances that brought them the gold medal.

3) Watching repeats of the Paralympics commercials.

4) When we were digging in our backyard to put in raised garden beds, and Jake cut the cable/internet line with the shovel...on the last day of the Olympics.

You would agree if you are an Olympic fanatic like me.


What would you do on a TV-less night when all you can think about is the final events of the Olympics?

You make marshmallow.


Fluffy, spongy, and white mallows dusted with powdered sugar over a bon fire. That was how we spent our TV-less night. Once you have this homemade stuff, you'll never go back to the big brand names.


The mallow saved the night. It turned out, having no TV and internet became one of our most enjoyable nights at home. I was binge watching the Olympics and other TV shows (last season of Dexter and House of Cards), that it became a routine to turn-on the TV every night. We decided to have a bonfire in the backyard and I started looking for marshmallow recipes because it's not a bonfire without something roasted on it. This recipe was easy and I had everything in the pantry ready to go. Ode to the Mallow!


Marshmallows
Recipe from Gourmet

About 1 cup confectioners' sugar
3 1/2 envelopes (2 tablespoons plus 2 1/2 teaspoons) unflavored gelatin
1/2 cup cold water
2 cups granulated sugar
1/2 cup light corn syrup
1/2 cup hot water (about 115°F.)
1/4 teaspoon salt
2 large egg whites*
1 teaspoon vanilla

1. Oil bottom and sides of a 13- by 9- by 2-inch rectangular metal baking pan and dust bottom and sides with some confectioners' sugar.

2. In bowl of a standing electric mixer or in a large bowl sprinkle gelatin over cold water and let stand to soften.

3. In a 3-quart heavy saucepan cook granulated sugar, corn syrup, hot water, and salt over low heat, stirring with a wooden spoon, until sugar is dissolved. Increase heat to moderate and boil mixture, without stirring, until a candy or digital thermometer registers 240°F., about 12 minutes. Remove pan from heat and pour sugar mixture over gelatin mixture, stirring until gelatin is dissolved.

4. With standing or a hand-held electric mixer beat mixture on high speed until white, thick, and nearly tripled in volume, about 6 minutes if using standing mixer or about 10 minutes if using hand-held mixer (see below for my notes). In a large bowl with cleaned beaters beat whites (or reconstituted powdered whites) until they just hold stiff peaks. Beat whites and vanilla into sugar mixture until just combined. Pour mixture into baking pan and sift 1/4 cup confectioners― sugar evenly over top. Chill marshmallow, uncovered, until firm, at least 3 hours, and up to 1 day.

5. Run a thin knife around edges of pan and invert pan onto a large cutting board. Lifting up 1 corner of inverted pan, with fingers loosen marshmallow and let drop onto cutting board. With a large knife trim edges of marshmallow and cut marshmallow into roughly 1-inch cubes. Sift remaining confectioners' sugar into a large bowl and add marshmallows in batches, tossing to evenly coat. Marshmallows keep in an airtight container at cool room temperature 1 week.

** It's easier to beat egg whites while the sugar mixture is heating over stove. Set egg whites aside, wipe bowl clean with a paper towel then pour hot sugar mixture into the mixing bowl. Beat sugar mixture until tripled in volume then add in egg whites. Beat until just combined.


Sunday, February 23, 2014

Korean Love

When I was 10, my family moved from Taiwan to Hong Kong. My parents decided to put my sister and I into a Canadian international school. The study body at this school was 5% foreign-born Canadians and 95% children of Asian expats who spoke little English. Naturally, cliches of various nationalities formed. There were only a couple of Taiwanese kids at the school, and somehow I ended up hanging out with the Koreans. It was the beginning of my love for Koreans food.


My best friend in elementary school was Korean. I envied her lunch of kimchi and different pickled vegetables, Korean sushi (not to e confused with Japanese sushi!), flavorful beef slices over rice. Every lunch, she had an assortment of containers for each side dish. While mine was one-box-fits-all-leftover lunch. I remember looking forward to her birthday party when I was in 5th grade, I wondered all day what Korean dish was going to be served. It was chicken wings from KFC. Big disappointment.


I requested Korean barbecue whenever my family goes out to eat and I was ecstatic when my family took a vacation in Seoul in 2002 right after the World Cup. I ate as much kimchi as I could, along with the most delicious dishes I have ever tasted. Though similar ingredients as Chinese cooking, there is just something about the ways the flavors are brought with the fermentation and spiciness.


Since I moved to the United States 10 years ago, my only time for another hearty Korean meal was in San Francisco. Satisfying, yes. The thought of having ten side dishes in front of me with a bowl of boiling Soondubu Jjigae (kimchi tofu stew)...hmmm...

For my birthday this year, I requested Han Woo Ri, a "fast Korean food" restaurant on Limestone in Lexington. Despite its positive reviews on Yelp.com, the dishes somehow hit the flavor spot but greasy. There was no side dishes, spiciness was zero. Another disappointment. So I do as what foodies do, I make Korean food. Surprisingly easy, my first batch of homemade kimchi brought all the childhood memories of playing with a group of Korean girls and eating lunch with my best friend. Yes, fermented and spicy napa cabbage brought me good memories. Isn't that why we eat?


Kimchi
Recipe from CHOW.com

1 (2-pound) napa cabbage
1/2 cup kosher salt
About 12 cups cold water, plus more as needed
8 ounces daikon radish, peeled and cut into 2-inch matchsticks
4 medium scallions, ends trimmed, cut into 1-inch pieces
1/3 cup Korean red pepper powder
1/4 cup fish sauce
1/4 cup peeled and minced fresh ginger (from about a 2-ounce piece)
1 tablespoon minced garlic cloves (from 6 to 8 medium cloves)
2 teaspoons Korean salted shrimp, minced
1 1/2 teaspoons granulated sugar

1. Cut the cabbage in half lengthwise, then crosswise into 2-inch pieces, discarding the root end. Place in a large bowl, sprinkle with the salt, and toss with your hands until the cabbage is coated. Add enough cold water to just cover (about 12 cups), making sure the cabbage is submerged (it’s OK if a few leaves break the surface). Cover and let sit in room temperature for at least 12 hours and up to 24 hours.

2. Place a colander in the sink, drain the cabbage, and rinse with cold water. Gently squeeze out the excess liquid and transfer to a medium bowl; set aside.

3. Place remainder ingredients in a large bowl and stir to combine.

4. Add the cabbage and toss with your hands until evenly combined and the cabbage is thoroughly coated with the mixture.

5. Pack the mixture tightly into a clean 2-quart or 2-liter glass jar with a tightfitting lid and seal the jar.

6. Let sit in a cool, dark place for 24 hours (the mixture may bubble). Open the jar to let the gases escape, then reseal and refrigerate at least 48 hours before eating (kimchi is best after fermenting about 1 week). Refrigerate for up to 1 month.
Pin It